CIERA A OWNER'S MANUAL
BAYLINER
Putting Quality First
1995
Welcome Aboard
This manual has been prepared to assist you in the operation and care of your Bayliner boat. Please read through it completely, as familiarization with its contents can contribute to the safe and effective operation of your boat.
Your Bayliner boat is part of a carefully engineered, power-matched package. It has been paired with an engine designed to provide optimum performance and utility. Installation of a different engine or other accessories, such as trim tabs, may cause undesirable handling characteristics. Should you choose to have a different engine installed, or to add accessories that will affect the boat's running trim, have an experienced marine technician perform a safety inspection and a handling test before operating your boat by yourself again.
Your boat's mechanical and electrical systems were designed to meet safety standards in effect at the time the boat was constructed.
Some of these standards were mandated by Federal law, others are considered industry norms. All of them were designed to insure your safety, and the safety of other people, vessels and property around you.
To maintain the Integrity and safety of your boat, only qualified people should perform maintenance on, or in any way modify the steering system, propulsion system, engine control system, fuel system, environmental control system, or electrical system. Failure to maintain these systems as designed could violate Federal law, and could expose you and other people to the danger of bodily injury or accidental death. We recommend that you follow the instructions provided in this handbook, in the engine owner's manual, and in the accessory instruction sheets included with your boat and engine package. We also recommend that you perform the following steps:
1. Make certain that you receive a full explanation of all systems from the dealer before taking delivery of your boat. Your selling dealer is your key to service. If you experience any problems with your new Bayliner, immediately contact the dealership. If for any reason your selling dealer is unable to help, call us direct on our customer service hotline for assistance. The number is (206) 435-8957.
2. Read this manual thoroughly, paying particular attention to the subjects of fueling, checking for fumes, starting, carbon monoxide, alcohol stoves, loading limits, trim tabs,
Recommendations for safety, and warranty.
Practice—all members of the family should be familiar with the operation and systems of your boat.
3. Participate in a safe boating course. Call the local office of the United States Power Squadrons, the United States Coast Guard Auxiliary, The Red Cross, or your state boating law enforcement agency for the date and location of their next class. Inquiries can be made to the Boating Safety Hotline, 1-800-368-564-7 or to the Boat U.S. Foundation information number 1-800-336-BOAT. The hazard warning symbols shown below are used throughout this manual to call attention to potentially dangerous situations which could lead to either personal injury or product damage. We urge you to read these warnings carefully and follow all safety recommendations.
DANGER
The symbol shown above alerts you to immediate hazards which WILL cause severe personal injury or death if the warning is ignored.
WARNING
The symbol shown above alerts you to hazards or unsafe practices which COULD result in severe personal injury or death if the warning is ignored.
CAUTION
The symbol shown above alerts you to hazards or unsafe practices which COULD result in minor personal injury, or cause product or property damage if the warning is ignored.
NOTICE
The symbol shown above calls attention to installation, operation, or maintenance information which is important to proper operation, but is not hazard-related.
There is information in this manual related to the following Bayliner Ciera boats:
2355 Sunbridge
2655 Sunbridge
2855 Sunbridge
Due to our commitment to product improvement, we reserve the right to change, without notice or other obligation, the specifications or information contained in this publication.
WARNING
A qualified operator must be in control of the boat at all times. Do not operate your boat while under the Influence of alcohol or drugs. Never operate your boat at speeds which exceed your ability to react if an emergency develops. At night, turn on the appropriate navigation lights and cruise at a reduced speed that will allow you plenty of time to avoid dangerous situations.
WARNING
Manufactured with 1,1,1-Trichloroethane, a substance which harms public health and environment by destroying ozone in the upper atmosphere.
Contents
Recommendations for safety, and warranty.
Electrical System (110-Volt AC)
HOLDING TANK AND VALVE LOCATION TABLE
GENERAL MAINTENANCE AND REPAIRS
WIRING DIAGRAM 2355 SJ Single Engine
WIRING DIAGRAM 2655 Single Engine
WIRING DIAGRAM 2855 ST Gas Engine
WIRING DIAGRAM 2855 ST Diesel Engine
WIRING DIAGRAM Single Dockside
Prior to leaving on your first outing (or, for that matter, any outing) there are certain items to check and activities to perform. Familiarize yourself with your boat while dockside, and consider the following suggestions:
1. Personal Flotation Devices (PFD):
1.One Coast Guard approved personal flotation device (PFD) of suitable size is required for each person aboard a recreational boat.
1.New PFDs bearing Coast Guard approval are now identified as Types l, II, III, or IV.
1.Requirements for boats sixteen feet (16' ) or over in length: One (1) Type I, II, or III (wearable) PFD for each person on board, and one (1) Type IV (throw able) PFD in each boat.
2. Always have children wear PFDs. Always check those devices intended for young children for fit and performance in the water.
2.Never hesitate to have "all hands" wear lifesaving devices whenever circumstances cause the slightest doubt about safety.
3. Take care to properly load your boat. Maintain adequate freeboard at all times. Consider the sea conditions, the duration of the trip, the weather and the experience of the personnel on board.
4. The operator of the boat is responsible for the safety of his passengers as well as his own. You should insure that everyone aboard is properly and securely seated in appropriate seating locations before starting. You should not allow sitting on seatbacks, gunnels, the bow, sun lounges, or the transom while underway. In many states it is illegal.
4.
DANGER
Do not allow anyone to ride on parts of the boat that were not designed for such use. Sitting up on seat backs, bow riding, gunwale riding, transom platform riding, or lounging on either forward or aft sundeck cushions while underway is especially hazardous and will cause personal injury or death.
5. Falls are the greatest cause of injury both afloat and ashore. Eliminate tripping hazards where possible, make conspicuous those that must remain, and require that everybody on board wear proper footwear.
6. Boat operators are required by law to file a Boating Accident Report with their state boating law enforcement agency when their boat is involved in certain boating accidents. A boating accident must be reported if (1) there is loss of life or probable loss of life, or (2) there is personal injury requiring medical treatment beyond first aid, or (3) there is property damage to boats or other property where the damage value exceeds $500.00 , or (4) there is complete loss of the boat. For further information and assistance contact the local law enforcement authorities.
7. Never drive the boat directly behind a water skier. At 25 m.p.h. the boat will overtake a fallen skier who was 200 feet in front in 5 seconds.
8. Understand the meanings of navigation buoys, and never moor to one. (It is a Federal offense.)
9. Know the various distress signals. A recognized distress signal used on small boats is to slowly and repeatedly raise and lower the arms outstretched to each side.
10. Storm signals are for your information and safety. Learn them and be guided accordingly.
11. A special flag (‘red flag with a white diagonal stripe or blue and white International Alpha) flown from a boat or buoy means diving operations are underway nearby. Approach with caution and stay clear by at least 25 yards.
12. Make sure your boat's engine is shut down before allowing people to swim to or from your boat, or to swim anywhere near your boat. Before lowering the transom boarding ladder, shut the engine OFF and remove the key from the ignition switch so that nobody will accidently start the engine while swimmers are nearby. Also, slow down and exercise extreme caution any time you are cruising in an area where there might be swimmers or water skiers in the water. Always keep a down skier in sight and on the operator's side of the boat when approaching the skier. Never back up to anyone in the water. Consult your state laws regarding skiing observers and downed skier warning flags.
WARNING
Rotating propellers can cause serious injury or death. Your boat's engine must be OFF and the key removed from the ignition switch when people are swimming anywhere near your boat.
13. Watch your wake. It might capsize a small craft. You are responsible for damage caused by your wake. Pass through anchorages at a minimum speed.
14. Learn and abide by common boating "rules of the road".
15. Always have up-to-date charts of your cruising area on board.
WARNING
It is the skipper’s obligation to know, understand and follow all navigational markers. Be aware of depth charts at all times. No vessel is built for, nor can it sustain, without damage, grounding. If grounding occurs, call for assistance immediately. Before removing the vessel, inspect the vessel thoroughly for holes or fiberglass cracking, fracturing or delamination. Make necessary emergency repairs before proceeding.
16. Keep an alert lookout. The operator is required by law to "maintain a proper lookout by sight (and hearing). He must insist that he has an unobstructed view particularly to the front. No passengers’ load or fishing seats should block his view when operating the boat above idle speed.
17. Always instruct at least one person on board in the rudiments of boat handling in case you are disabled or fall overboard.
18. Consider what action you would take under various emergency conditions such as a person overboard, fog, fire, a damaged hull or other bad leaks, engine breakdown, severe storm or collision.
19. If your boat ever capsizes, remember that if it continues to float, it is usually best to remain with it. You are more easily located by a search plane or boat.
20. Keep firefighting and lifesaving equipment in good condition and readily available at all times.
21. Do not test fire extinguishers by squirting small amounts of the agent. The extinguisher might not work when needed. Always follow approved instructions when checking fire extinguishers.
22. Have an adequate anchor and sufficient line (at least six times the depth of the water) to assure a secure hold in all types of weather and sea conditions.
23. Boat hooks are valuable when docking or when needed to retrieve objects that have fallen overboard.
24. Keep electrical equipment and wiring in good condition. Allow ample ventilation around batteries.
DANGER
Knife switches or other arcing devices should never be installed in fuel compartments.
DANGER
Never substitute automotive parts for marine parts.
Electrical, ignition and fuel system parts on your Bayliner are designed and manufactured to comply with
U.S. Coast Guard Rules and Regulations to minimize risks of fire and explosion.
25. Good housekeeping in your boat is important. Cleanliness diminishes the probability of fire.
26. Know your fuel tank capacity and cruising range. If it is necessary to carry additional fuel, do so only in proper containers. Take special precautions to prevent the accumulation of fuel vapors in confined spaces.
WARNING
Fuel vapors are explosive. Do not store portable fuel containers in unventilated locations. The vapors would be trapped and might be ignited accidentally.
27. Before departing on a boat trip, advise a responsible friend or relative about where you intend to cruise. Be sure to give that person a good description of your boat. Keep them advised of any changes in your cruise plans. These precautions will enable your friend or relative to tell the Coast Guard where to search for you and what type of boat to look for if you fail to return. Be sure to advise the same person when you complete your trip to prevent any false alarms about your safety.
28. Your local United States Coast Guard Auxiliary, the United States Power Squadrons, The Red Cross, and your state boating law enforcement agency offer safe boating classes several times a year, These are comprehensive courses, and are generally of minimal cost to you. Call your local U.S. Cow Guard Auxiliary, Power Squadron Flotilla, or your state agency for the time and place of their next class. Inquiries can be made to the Boating Safety Hotline, 1-8004368-5847 or to the Boat U.S. Foundation information number 143004336-BOAT.
28.
The following safety-related items should be considered as pan of your standard equipment:
1. Fire extinguishers (correct number and type, located for easy access)
2. Personal flotation devices
3. Fenders, lines and boat hook
4. Flares (night and day type with unexpired dates)
5. Flashlight(s) with extra batteries
6. Charts of your intended cruising area
7. First aid kit
8. Anchor and adequate line
Tool Chest
1. Assorted screwdrivers (Phillips and flat blade)
2. Pliers (regular, channel lock and vise-grip)
3. Wrenches (box, open-end, Allen, adjustable, include one wrench large enough, 1 ‘/16", to fit the prop nut)
4. Socket set (U.S. standard)
5. Hacksaw with spare blades
6. Hammer
7. Battery jumper cables
8. Electrical tape
9. Assorted fasteners
10. Gear grease and penetrating oil
Miscellaneous Items
1. Engine and accessories manual
2. Spare propeller with fastening hardware
3. Extra V-belts
4. Engine lubricating oil
5. Spare fuel and oil filters
6. Portable fuel can
7. Replacement light bulbs
8. Spare set of spark plugs
9. An assortment of spare fuses
The static floating attitude of your boat can be affected by many variables. Optional equipment and loading of gear are the biggest contributors to a boat's list. After launching, the floating attitude of any new boat can be adjusted. If your boat lists to one side, load heavy items on the opposite side until the boat floats more level. Load the remainder of your gear evenly after that.
Other Tips:
1. When commissioning a new boat, do not plan an extensive trip or outing until you have had a shakedown cruise to make sure all equipment on your boat is functioning properly and you are familiar with its operation.
2. Use big fenders or fender boards to protect your boat‘s hull whenever mooring next to floats, piers, or other boats.
3. Carly plenty of line that is properly sized to your boat. We suggest at least three 30’ lengths of 5/8" nylon line.
OPERATING
WARNING
Fuel vapors are explosive and can become trapped in the lower portions of a boat where they might be ignited accidentally. While fueling, all doors, hatches, and port lights must be closed.
WARNING
Do not use fuels that incorporate any form of alcohol or alcohol derivatives. Alcohol destroys marine fuel system hoses and components, which could lead to hazardous leaks, fire or explosion.
If you're going to fuel your boat while it's in the water, be sure that it's securely moored to the dock.
Turn off all electrical equipment, including engines, appliances, bilge blower, lights, etc.
Extinguish all cigarettes, cigars or other items that may produce a spark or flame.
Close all openings including hatches, windows, doors, and port lights.
Through-deck fittings are provided for fuel tank filling. Remove the cap and insert the fuel supply nozzle, allowing the nozzle to maintain contact with the fitting; this will prevent possible static sparking.
After about 10 gallons have been pumped into the tank, inspect the engine and tank area for signs of fuel leakage. Proceed with fueling if no problem is detected.
Often you won't be able to fill the fuel tank to 100% of its dry-rated capacity. This is because the amount of fuel the tank will hold depends, in part, on the boat's floating attitude, which in turn affects the position of the fuel tank and its venting system. If fuel flows out the tank vent, discontinue fueling immediately. The tank will be as full as possible under the current conditions. It is advisable not to overfill the tank anyway, as you want to allow for thermal expansion of the fuel, especially on very hot days.
If, when filling the tank, you can’t put fuel in at a reasonable rate, check the fuel vent line to see that it’s not kinked or plugged.
When you have finished fueling, replace the fill cap and wipe off any fuel spillage.
Open the engine compartment and all windows, doors and hatches; inspect both visually and by smell, for fuel fumes or leakage. Any sign of fuel leakage, or any indication of fumes, must be investigated and corrected prior to starting the engine.
| 2355 SJ | 55 Gallons = 208 Liter |
|---|---|
| 2655 SB | 70 Gallons = 265 Liter |
| 2855 ST | 109 Gallons = 412,61 Liter |
Starting
The engine operating and maintenance manual furnished with your engine describes prestart and starting procedures. The following notes are basic reminders, and are not intended to cover every detail of engine starting. We urge you to thoroughly read and understand your engine manual.
1. Check the lubricating and cooling fluid levels.
2. Visually check for fuel, oil, and coolant leaks.
3. Make sure the emergency engine shutdown switch cap is in place and the lanyard is attached to the operator.
WARNING
A serious accident can occur if the emergency engine shutoff switch lanyard is not fastened to the boat operator. In order for the emergency engine shutdown system to operate correctly, the lanyard must be physically attached to the operator (around the wrist or securely fastened to a stout piece of clothing, such as a belt, etc.).
WARNING
Gasoline vapors are highly explosive. To prevent a possible explosion and fire, check the engine and fuel compartments before each engine start for fumes or accumulation of fuel. Always operate the bilge blower for at least four minutes before engine starting, during the starting process and anytime you are operating your boat below cruising speeds.
4. Operate the bilge blower for at least four minutes prior to starting the engine. Leave the blower on until the boat is underway and up to cruising speed, then turn it off. DO NOT leave the blower running or its motor will eventually burn out.
5. Before starting the engine, ensure your boat is in deep enough water to lower the stern drive unit. Lower the stern drive units down to its normal running trim position by activating the trim switch on the throttle lever's handle.
6. For boats with a single handle, side-mounted shift/throttle lever:
6.With the throttle lever in NEUTRAL, push in the "Throttle Only Button" to permit throttle travel in NEUTRAL without engaging the stern drive. Next, move the throttle lever forward to the full open position, then pull it back to the 1/4 open position and leave it there.
7. For boats with dual handle control installations:
7.Move the throttle lever to the full SLOW/START throttle position, then pull the shift lever to the NEUTRAL position.
8. Turn the ignition key clockwise to start the engine, releasing the key when the engine starts. If you are starting a cold engine, you can enrich the starting mixture by activating the choke. Most stern drive engines will choke automatically when you set the throttle as described in the previous step, though you should refer to the engine owner's manual for the exact procedure that applies to your engine.
9. DO NOT continuously operate the starter for more than 15 seconds at a time. Allow at least one minute for cooling between start attempts.
10. Warning alarms may activate upon engine start. These devices are intended to call your attention to the condition of one or more of the engine's subsystems. Generally, there are two times when warning alarms will sound. The first is upon initial engine start, when the alarm will sound for about 7 to 14 seconds. This indicates that the warning system is working so that if a malfunction occurs later, you can be fairly certain the alarm will sound again to alert you to the problem. The other situation when you‘ll hear an alarm is when there is actually something wrong with one of the engine subsystems.
10.Conditions causing an alarm to sound are high engine coolant temperature, low engine oil pressure, or low oil level. The exact meaning of each alarm varies depending on the engine manufacturer, and not every engine has all of the alarms mentioned above, we recommend that you refer to the engine owner's manual that came with your engine for more specific information.
11. Check the oil pressure, voltmeter and temperature gauges immediately after the engine starts. Also inspect the engine compartment for fuel, cooling, or exhaust system leaks that were not apparent before you started the engine.
12. Once the engine has been started, allow it to warm up for several minutes before getting underway.
13. Check steering operation by turning the steering wheel full port and starboard while observing the stern drive movement. In addition, regularly check to be sure the original SELF-LOCKING nuts are in place on the ”steering link rod” between the steering cable and the engine. These nuts must never be replaced by common or non-self-locking nuts which can vibrate oft. Have your dealer check your steering system thoroughly at least once a year for proper lubrication, any unusual backlash, and any unusual component wear.
14. While the boat is still securely moored to the dock, advance the shift control to forward, to reverse, and into neutral to check shifting operation.
WARNING
On boats with dual handle control installations, always move the throttle lever to the SLOW position before moving the shift lever to either the FORWARD or REVERSE positions. Failure to do so can cause stern drive damage and possible injury or death.
Carbon Monoxide
DANGER
Carbon monoxide (CO) is a poisonous gas that is colorless, odorless and about the same weight as air. It will distribute itself throughout spaces of the boat in dangerous concentrations if proper ventilation is not provided. A person breathing these fumes will become seriously ill. Direct and prolonged exposure will cause brain damage or death. Always run the bilge blower whenever the engine is idling. Opening windows or hatches may improve ventilation. Also, never operate the engine when either the slant cover or the camper cover is installed.
Because CO diffuses in the air much more rapidly than easily detectable gases you cannot rely on sight or smell to recognize its presence. CO will be produced anytime materials containing carbon are burned. Common sources of CO are internal combustion engines and open flame devices such as cooking ranges, space heaters, and charcoal grills.
The symptoms of CO poisoning include but are not limited to the following:
1. Watering and itchy eyes
2. Flushed appearance
3. Inattentiveness and the inability to think clearly
4. Ringing in the ears
5. Tightness in the chest
6. Headache and/or throbbing temples
7. Drowsiness and fatigue
8. Incoherence
9. Nausea and/or vomiting
10. Dizziness
11. Collapse
12. Convulsion
If someone is suffering from CO poisoning move the person to fresh air, administer oxygen if available, and contact medical help. If the victim is not breathing perform approved CPR procedures until medical help arrives and takes over.
To help prevent exposure to CO check that ventilation systems are operating properly and for any exhaust leaks. Also be aware of your surroundings.
Running your engine or generator in a confined space such as a boathouse or next to a seawall can allow dangerous accumulations of CO. Another boat with an engine running moored nearby can also expose you to dangerous amounts of CO. Be sure that while underway there is a good flow of fresh air through the boat by opening a forward hatch and companion way doors and that exhaust fumes are not being pulled up into the boat by “back drafting". Back drafting will be greater whenever canvas is installed, or when coming with the wind, or if you run in a bow-up trim angle.
WARNING
Gasoline portable generator sets produce CO. These units discharge their exhaust where they are located which can lead to the accumulation of CO in the area. This equipment is not recommended for use on recreational vessels.
Provided you have not encountered any problems, you are almost ready to go. (if you did encounter problems, do not attempt to operate your boat until they are corrected.) Before you leave, perform the following steps:
1. Check the operation of equipment such as bilge pumps, running lights, wipers, radios, etc.
2. Instruct passengers in the use and location of flotation devices and fire extinguishers.
3. Obtain a reliable weather forecast and plan accordingly for everyone's comfort and safety.
4. Notify a responsible friend or relative of your cruise plans. Upon your return or a change in your cruise schedule, notify that person again in order to avoid unnecessary concern.
5. Fill potable Water tanks.
6. Make sure your self-contained head has fresh chemical solution.
When all of your pre-departure checks have been completed, you will be ready to leave the dock.
Basic Maneuvering
Your boat features a "modified-vee" planing hull that has several handling characteristics you should be aware of.
Steering the boat at either idling or cruising speeds will generally require minimal effort. However, operating at a speed just below that required to get the hull on plane may produce excessive steering torque. This is a normal condition, though you should not continue to operate the boat at this speed. Instead, continue accelerating until the boat is on plane, where the amount of steering torque will return to normal. Your boat may wander slightly from port to starboard when operating at idle speed in forward gear. This is a natural characteristic of deep-vee hulls and shouldn‘t be cause for concern. Simply correct for this wander with gentle helm inputs until you get up to cruising speed.
Another characteristic you may notice is that the helm wheel may pull in one direction or the other, depending on whether the boat is traveling in forward or reverse gear. This is caused by a non-horizontal prop shaft
angle, which causes the stern of the boat to be pulled to one side as power increases, especially when starting from a fully stopped position.
Again, this is a normal condition that may be minimized by adjusting the trim angle of the prop shaft on boats equipped with power trim and by adjusting the steering torque tab or trim tab of the stern drive. Boats with power steering do not require a steering torque tab. See your engine owner's manual for detailed information. Practicing maneuvers at slow speeds will help you to become familiar with all the special handling characteristics associated with your boat.
WARNING
Do not attempt any maintenance or adjustments to the engine or stern drive unit while the engine is running. Failure to shut off the engine for maintenance or adjustments may cause injury or death.
Remember that all boats steer by the stern (the feeling is much like steering your automobile in reverse). This means that the stern on your boat will swing in the direction opposite to your turn. For example, when you turn the helm wheel to the left, the stern of the boat will swing to the right as the boat goes into a left turn. This is especially important to keep in mind when docking, when operating in close quarters with other boats, or when approaching a swimmer or downed skier in the water.
If your boat has twin propellers, you can engage one engine in forward gear and the other in reverse gear to turn the boat completely around in its own length. Usually the steering is left in the centered position. You can make such a turn in either direction. Port engine forward and starboard engine in reverse spins you clockwise. Starboard engine forward and port engine in reverse spins you counterclockwise. You usually can increase the rate of spin by turning the steering in the direction of the spin. Always use extreme caution when approaching someone in the water. Approach them at idle speed only, allowing your stern to swing away from them as you get close. Place the shifter in NEUTRAL and shut off the boat's engine when you are still several feet from the person in the water. While they are swimming over to the boat, lower the swim ladder from the transom platform so they can board. Once everyone is aboard, return the swim ladder to its stowed position and check that everyone is safely seated before restarting the engine. It you are unfamiliar with picking up swimmers in the water, practice this maneuver with a retrievable floating object before attempting it under actual conditions.
WARNING
Rotating propellers can cause serious injury or death.
Your boat's engine must be OFF and the key removed from the ignition switch when people are swimming anywhere near your boat.
Boats do have not brakes. Stopping is accomplished by backing down on the throttle. Once the boat has slowed and the engine is idling, you can place the shifter in REVERSE. Gradually increasing reverse power with the throttle will allow you to stop the boat in a very short distance. Note that a boat will not respond to steering in reverse nearly as well as it does when going forward, so do not expect to accomplish tight turning maneuvers when backing up.
Once you are away from the dock, devote some time to learning how to maneuver.
· Practice docking by using an imaginary dock.
· Practice stopping and reversing.
· When operating in close quarters or docking, all maneuvering should be done at idle speed. Proceed with caution in congested areas.
· Gradually increase your speed. Get used to the boat before operating at full throttle.
RIGHT TURN LEFT TURN BACKING TO LEFT
Turn wheel to right Turn wheel to left, Turn wheel to left
Stern will move to left. Stern will move to right Stern will pull to left.
SINGLE DOCK MOORING
Stern Drive Trimming
The stern drive on your boat is equipped with power trim. You can change the angle of the prop shaft by pressing the trim switch. For an explanation of the handling characteristics caused by trimming your stern drive see your engine owner's manual.
Bow steering:
Your boat is designed to give you quick acceleration with a minimum amount of time spent in the bow-up transitional planing off condition.
Planing your boat is most easily and quickly accomplished by trimming
the stern drive fully “under” or “in”. However, once on plane, the stern drive should be trimmed out a little to avoid a bow down condition called "plowing". Plowing can cause “bow-steering” or “over steering” and poor fuel economy. In this condition, if attempting a turn or encountering diagonal waves, a more abrupt turn than intended may result.
Preparation:
Proper docking requires preparation. Start by making sure you have adequate mooring gear, and that it is stowed correctly and ready for use. Your dealer is the best source for information concerning the amount and type of equipment you should carry.
Approaching the Dock:
When approaching a mooring area, lower your speed within a reasonable distance to allow your wake to subside before it reaches other boats or docks. As you get close to your moorage, check for any wind or current action that may affect your maneuver; then make a consentative approach with these factors in mind. Try to use the elements to your advantage. Allow them to carry the boat into the dock. If there are high winds or strong currents, it is best to approach the moorage from the lee side. With a mild current and little or no wind, it is best to approach from the windward side. While approaching, check to see that all lines are attached to the cleats on the side facing the moorage. Also insure that fenders are lowered on that side. Be sure to check that the fenders are hung at the proper height.
As you approach your moorage, it is desirable to have one person at the bow and one at the stern of the boat, each with a boat hook and a mooring line attached to a cleat. Approach at idle RPM at an angle approximately 45 degrees to the dock. When the bow is within a few feet of the dock (starboard side) the stern can be brought alongside the moorage by turning hard to port. Next, turn to starboard and at idle RPM put the boat into REVERSE. This will stop the boat and bring the stern even closer to the dock. These steps are reversed for docking to port.
Mooring:
To attach lines to deck cleats, make a loop in one end of the line and pass it through the hole in the base of the cleat; then pass the loop back over the entire cleat. The line can now be used to secure your boat.
Lines may be kept this way while underway as long as they are coiled and cannot become fouled in deck gear or props. In heavy sea conditions, all lines should be removed from the decks.
WARNING
Whenever you are towing another boat, or having your boat towed, make sure the towline is fastened securely to the bow or transom towing eyes only. Never attach a towline to deck cleats or the anchor windlass (if so equipped), as serious injury may result if the cleats or windlass pull free from the deck. Also, to reduce the danger created by a potential failure of the towline, everyone should stay well clear of the towline attachment points on both the towing and the towed boats.
Leaving the Dock:
Take into account wind, tide, current and other forces that affect your maneuvering as you leave the dock. Most maneuvering to and from a dock is best accomplished at idle speeds. Do not forget to release the mooring lines and stow the fenders. When leaving a moorage on your starboard side and your bow cannot be pushed away from the dock first, start forward with the helm wheel turned to starboard for two or three feet. Then shift to REVERSE with steering full to port. Repeat if necessary to get the stern far enough away from the dock so you can back clear of any other boats that may be moored ahead of you. (Reverse steering wheel directions when leaving a dock located to port.)
Boat speeds are affected by a great many factors. Some, such as temperature and altitude, you cannot change, but some factors you can:
1. Loading: Take only necessary equipment with you. Keep weight low in the boat and balanced.
2. Propeller(s): Keep them in good repair and at the correct pitch for your particular situation. The factory standard equipment propeller(s) may not be the best for your particular use and load conditions. If the engine RPM at full throttle exceeds or is less than its maximum rating ask your Bayliner dealer about using a different prop. A slightly bent or nicked propeller will adversely affect the performance of your boat.
3. Weeds, barnacles and other growth: Keep your boat's bottom clean. When your boat starts “growing grass", it will slow down greatly.
Boat Running Attitude
1. If your boat runs with its bow too high at cruising speeds, the following suggestions will help you achieve a more correct cruising attitude:
· Move some weight forward in the boat.
· Adjust the trim tabs. (See the Trim Tab section below.)
· Adjust the thrust angle of the stern drive (reduce the distance between the bottom of the transom and the drive unit). See your engine owner’s manual for trimming instructions.
2. If your boat runs with its bow too low at cruising speeds (usually indicated by water coming of the hull tar forward and steering difficulty or veering off course), you can raise the bow by performing steps opposite of those above.
Trim tabs are intended for corrections to boat trim on the port and starboard axis; however, they may also create very minor changes in pitch (fore and alt) attitude. For major corrections, redistribute loads.
1. If the tab position is unknown, put both tabs in the full bow-up position.
2. Alter power has been applied and the boat is up to cruising speed, push the appropriate tab button to level the boat from side-to-side. Several short touches of the tab button are recommended, rather than one long one.
2.Allow the boat to react to the new position of the trim tab after each touch.
2.When installed in accordance with the manufacturer’s recommendation, the port trim tab switch will operate the starboard trim tab and vice versa.
3. Both tabs can be lowered slightly to lower the bow. However, forcing the bow down too tar with trim tabs will cause steering difficulty and a loss of efficiency.
4. When running in a following sea, set the trim tabs to the lull bow-up position.
WARNING
Improper use of trim tabs can cause a loss of control.
Do not use trim tabs in a following sea, as they may cause breaching or other unsafe handling characteristics. Do not allow people who are unfamiliar with trim tabs to operate them.
As mentioned earlier in the basic maneuvering section, the boat's steering will usually pull to one side or the other to some degree. This effect is caused by a non-horizontal prop shaft angle and the torque reaction of the propeller. Adjust the prop shaft angle by using the trim switch. Most stern drives have a trim tab that can be adjusted so there is very little pull on the helm wheel at one given speed or trim angle. This is done by setting the trim tab on the lower unit of the stern drive in the direction the wheel is pulling. Small adjustments should be made until the steering has neutral torque (does not pull in either direction) at the speed you desire. We suggest adjusting it for your normal cruising speed. When running faster or slower than this speed, a small amount of steering pressure will always be present and is considered normal.
WARNING
Do not attempt any maintenance or adjustments to the engine or stern drive unit while the engine is running. Failure to shut off the engine for maintenance or adjustments may cause injury or death.
While underway, instruments should be checked frequently for possible indications of trouble.
1. Tachometer - A tachometer is an electrical instrument that indicates engine revolutions per minute (RPM). The tachometer is useful for monitoring engine speed to avoid exceeding the maximum RPM rating. In addition, it can be used to detect performance changes by comparing speedometer readings at various RPMs.
2. Temperature Gauge - The temperature gauge indicates engine coolant temperature by monitoring a signal from a sending unit installed in the engine water jacket. When the gauge reads in the danger area, shut off the engine and diagnose the problem. A common cause of overheating is picking up a foreign object in the seawater intake. Usually, raising and lowering your stern drive will free it. Backing up in reverse gear, then pulling ahead in forward gear for 10-15 feet is helpful, too. On those twin-engine powered boats equipped with a hot water system, whereby the cooling system
of one engine is plumbed through the hot water tank to provide heating for the fresh water supply, the temperature gauge for that engine will indicate a different operating temperature than the other engine.
3. Oil Pressure Gauge - The oil pressure gauge indicates engine lubricating oil pressure. Low oil pressure readings are generally caused by low oil quantity. In any case, immediately shut down the engine and diagnose the problem.
4. Fuel Gauge - The fuel gauge indicates approximate fuel level. Since boats are exposed to rough water conditions and varying degrees of trim, it will not always be possible to fill the fuel tank to 100% of its dry-rated capacity. Therefore, fuel gauges may seem to provide inaccurate readings at times. It is always good to keep track of the amount of fuel you pump aboard, as well as your running time and estimated fuel usage as a double check against an inaccurate gauge.
5. Volt Gauge - On all models the condition of the battery can be read on the voltmeter when the ignition switch is in the ON position. With the engine not running, voltmeter readings in the 11.5 to 12.5 volt range are considered normal. Headings in the 10 to 11.5 volt range indicate a marginal charge condition. Readings below 10 volts indicate a seriously discharged condition.
With the engine running (over 1500 RPM), voltmeter readings of 13 to 14 volts are considered normal. Headings below this indicate a severely discharged battery or a nonfunctioning charging system.
6. Compass - Your boat may come equipped with a compass for use in navigation. Many factors affect the operation of your compass, such as local magnetic variation and deviation (induced needle deflection caused by metal components and the operation of electrical equipment aboard your boat). Each compass must be “swung” (compensated) to adjust for individual boat characteristics, and for the particular compass installation. It is vitally important, therefore, that you have your compass professionally swung before using it for marine navigation. Your Bayliner dealer can refer you to local shops that perform this work.
Electrical System (12 Volt DC)
DANGER
Knife switches or other arcing devices should never be installed in fuel compartments.
DANGER
Never substitute automotive parts for marine parts.
Electrical, ignition and fuel system parts on your Bayliner are designed and manufactured to comply with U.S. Coast Guard Rules and Regulations to minimize risks of fire and explosion.
WARNING
To reduce the risk of fire or explosion only qualified personnel should install batteries and perform electrical system maintenance. You can minimize the danger of fire and explosion by not exposing the batteries to open flame or sparks. It is also important that no one smoke anywhere near the batteries. Because fuel fumes are heavier than air, they will collect in the bilge areas where they can be accidently ignited. Operating the bilge blower for at least four minutes prior to engine starting, electrical system maintenance, or activation of electrical devices will decrease the danger of fire and explosion.
NOTICE
Electrical connections are susceptible to corrosion. To help prevent electrical malfunction due to corrosion, keep all exposed electrical connections clean and protect them with a good quality spray-on protectant such as Corrosion Guard.
Although Bayliner manufactures many different models of power-boats, the electrical systems on all models operate on the same basic theory.
1. Battery:
The key to a good marine electrical system is the battery (the batteries are dealer-installed items). Bayliner makes the following recommendation on battery rating:
Stern Drive Models — 500 cold cranking amps minimum
All single-engine boat models use one battery to provide engine starting power and accessory power. The condition of the battery can be read on the voltmeter when the ignition switch is in the ON position.
Twin engine models are equipped with two master battery switches, one for the port engine circuit and the other for the starboard engine circuit. Both switches offer a crossover feature. The port circuit provides power for: port engine start, tilt/trim switch power, stereo-electronics, navigation lights, bilge blower, bilge pumps, horn, wiper, and trim tab pump. The condition of this battery can be read on the port voltmeter when the port ignition switch is in the ON position. The starboard circuit provides power for starboard engine start and all remaining 12-volt DC accessories. The condition of this battery can be read on the starboard voltmeter when the starboard ignition switch is in the ON position.
CAUTION
The crossover switch(es) should be turned on only in emergencies. Leaving the switch(es) ON can drain all onboard batteries. Also, you should never disconnect battery cables or turn the main battery switch(es) to the OFF position while the engine is running, as this can cause damage to your boat's electrical components.
CAUTION
The battery charging systems (alternator and battery charger) installed are designed to charge conventional lead acidaries. Before installing gel-cell or other new technology batteries, consult with the battery manufacturer about charging system requirements.
Check the battery electrolyte level regularly. Remove the caps on top of the battery and observe the level of the fluid inside. If the zinc plates are exposed, add distilled water until they are covered again.
Corroded terminals can impair battery performance and charging ability. Clean them with baking soda and water; then coat them with a preventative or a light film of grease. Be sure all battery connections are tight. When storing the boat, it is best to remove the battery, give it a full charge, and store it inside away from extreme temperatures.
Fuses and Circuit Breakers:
Standard equipment fuse blocks are located near the instrument panel. On diesel engine models, the engine circuit is protected by a circuit breaker on the engine and the accessory circuit is protected by an inline fuse at the battery switch. On gas engine models, engine and accessory circuits are protected by a large circuit breaker located on the engines. For more detailed information, refer to the wiring diagrams at the back of this manual.
Electrical System (110-Volt AC)
The AC system is energized by shore power.
Shore power receptacles are rated at 30-amps and appropriate power cords are furnished. Since not every shore installation has 30-amp service, we recommend that 15- and 20-amp adapters be purchased.
However, whenever 15- or 20-amp adapters are used, there will be a corresponding drop in supplied power from the dockside system.
CAUTION
Never hook dockside power to your boat overseas unless you purchased the overseas option, which is rated for 220 volt/50 Hz, whereas standard domestic systems are rated for 110 volt/60 Hz. power.
WARNING
Monitor the electrical control panel’s polarity indicators when connecting shore power to your boat. A green light illuminating after the power cord is ‘plugged into the boat's external power receptacle indicates acceptable electrical power. Therefore, you may energize the main breaker switches. However, a red light indicates reversed polarity, which could cause electrical system damage and possible electrical shock injuries. In this case, DO NOT energize the main breaker switches. Instead, immediately disconnect the shore power cord (always from the dockside outlet first) and notify marina management.
Before connecting to shore power ensure all breakers and switches on the A/C master panel are in the OFF position. Always attach the shore power cord to the boat inlet first, then to the dock connection, thereby avoiding accidental dropping of the "hot" cord into the water. Correspondingly, remove the dock connection first before removing the cord from the boat inlet. On models with a single dockside inlet, check for proper polarity as outlined above. Activate the AC system by first turning on the master breaker, then each individual component breaker as required.
On models with dual dockside inlets, check for proper polarity as outlined above. Each dockside inlet is labeled inside the weatherproof cover, Line 1 or Line 2, which corresponds to the line each operates on the AC master panel. This system is designed so that each line operates independent of the other. Activate the AC system by first turning on the master breakers, then each individual component breaker as required. Whether using shore power or the generator, the simultaneous operation of several 110-volt accessories can result in an overloaded circuit. It might be necessary to turn off one accessory while operating another. All models with 110-volt receptacles in the head and galley are equipped with ground fault circuit interrupters to protect users from electric shock. This device will also protect other labeled outlets.
Hot Water Heater
The water heater is connected to the 110-volt power system. On those models equipped with freshwater engine cooling, the coolant from the closed engine cooling system is circulated through the hot water tank for heating of potable water. Heaters must be kept full of water to avoid damage to the 1 10-volt heating elements. They should also be drained (power turned OFF) when the possibility of freezing exists.
Air Conditioning/Heating
Both heating and cooling (on boats equipped with air conditioning) are controlled from the same panel. Refer to the Environmental Control Unit booklet supplied in your information packet for detailed instructions concerning proper operation of the heating and air conditioning systems.
Battery Charger
CAUTION
The battery charging systems (alternator and battery charger) installed are designed to charge conventional lead-acid batteries. Before Installing gel-cell or other new technology batteries, consult with the battery manufacturer about charging system requirements.
The battery charger operates when 110-volt AC dockside power is connected and the battery charger circuit breaker is ON.
110-Volt/12-Volt Refrigerator
The refrigerator operates on 110-volt AC and 12-volt DC power. When the 110-volt system is not hooked to an AC source, the refrigerator operates on 12 volts. When an AC source is supplied by dockside power and the 110-volt refrigerator breaker is ON, the refrigerator automatically switches to 1 10 volts.
The refrigerator is the heaviest continuous draw on the 12-volt system. If no other 12-volt accessories are used, the refrigerator can draw a 100-amp battery dead in less than 24 hours. For this reason it is recommended that when operating on 12 volts, the cold setting on the refrigerator should not be set higher than position two. It is also advisable to turn the refrigerator off at night. If you are going to be out more than one day and cannot connect to dockside power, you should plan to run the engine each day to maintain a charged battery.
Starter Motor
The engine starter motor is designed to deliver high horsepower for only very short periods of time. Avoid operation for more than 15 seconds at a time. Allow at least one minute for cooling between start attempts. Due to its high horsepower, this motor builds up considerable heat and can be permanently damaged with prolonged use. If it does not operate, check the battery charge and all direct wiring for shorts or loose connections. The starter can be damaged in stern drive models if excess bilge water is allowed to come in contact with it. Automatic bilge pumps are recommended for boats left in open moorage.
The bilge blower removes fumes from the engine compartment and draws fresh air into the compartment through the deck vents. To ensure fresh air circulation, the bilge blower is to be used before starting the engine, during starting, and while the boat is operating below cruising speed. Operate the blower for at least four minutes before starting the engine. Operation of the blower is NOT A GUARANTEE that explosive fumes have been removed. If you smell any fuel, shut off the engine and all electrical accessories and investigate immediately.
Bilge Pump
The electric bilge pump supplied with your Bayliner is an impeller-type pump. It is controlled by a switch on the dash panel, which should be activated whenever water begins to accumulate in the bilge. Some models will also have an automatic bilge pump switch (“auto float switch”) mounted next to the pump. This is afloat-type switch that will activate the bilge pump automatically whenever bilge water accumulates above a pre-set level. It is wired directly to the battery so it will normally function even when the boat is completely shut down and unattended, such as when the boat is moored at a marina. Operation of the bilge pump should be checked frequently. To check the bilge pump, activate the dash-mounted switch and verify that any
water in the bilge is pumped overboard. If bilge water is present and the pump motor is running but not pumping, check to see if the pump is clogged with debris. Squeeze the two holding tabs on the side of the pump housing inward and pop the pump's upper housing off. If the pump's strainer well is clear but the pump still does not move water, check the discharge hose for kinks or a collapsed area. The auto float switch should also be checked frequently for proper operation. Squeeze the two holding tabs on the side of the switch housing inward and pop the upper housing oft. Remove any debris you find in the strainer well. Then raise the float to verify it has full up and down movement. As you raise the float to its full up position, the bilge pump should turn on and empty all bilge water overboard. If raising the float does not switch the pump on, check if there is an in-line fuse in the wire between the switch and the battery. If there is, make sure it has not blown. If the fuse is good, but the switch still does not work, it usually indicates a bad switch, or possibly a low battery. In either case, call your dealership for further assistance.
NOTICE
The Federal Water Pollution Control Act prohibits the discharge of oil or oil waste into or upon the navigable waters and contiguous zone of the United States if such discharge causes a film or sheen upon, or discoloration of, the surface of the water, or causes a sludge or emulsion beneath the surface of the water. Violators are subject to a penalty of $5000.
AM/FM Cassette Stereo
The AM/FM cassette stereo that comes standard with your Bayliner has a separate brochure that explains its operating features. Note that AM radio reception will be impaired anytime the engine is running.
Depth Sounder
Your Bayliner may come equipped with an electronic depth sounder.
It will provide you with measurements of water depth beneath the boat.
In many cases it also will help you locate schools of fish. The depth sounder comes with its own owner's manual. We suggest that you read it carefully before turning on the unit.
WARNING
The depth sounder should not be used as a navigation aid to prevent collision, grounding, boat damage or personal injury. When the boat ls moving, submerged objects will not be seen until they are already under the boat, or bottom depths may change too quickly to allow time for the boat operator to react. Always operate the boat at very slow speeds if you suspect shallow water or submerged objects.
Navigation Lights
Vessels are required to have navigation lights turned on from “dusk to dawn” or in conditions of reduced visibility. It is wise to turn at reduced speed whenever navigation lights are needed. Although the navigation lights supplied with your Bayliner are of top quality, failure may occur for a variety of reasons:
1. There may be a blown fuse. (Replace the fuse in the switch panel.)
2. The bulb may be burned out. (Carry spare bulbs for replacement.)
3. The bulb base may be corroded. (Clean the base periodically and coat it with nonconductive grease.)
4. A wire may have come loose or may be damaged. (Repair as required.)
CAUTION
Avoid the storage of gear where it would block the navigation lights from view.
NOTICE
Prolonged operation of cabin interior lights (overnight) will result in a dead battery. Be conservative in the use of battery power.
Fuel System
CAUTION
It is very important that the fuel system be inspected thoroughly the first time It is filled and then at each subsequent filling. For your safety and the safety of your passengers, the fueling instructions in this manual must be followed.
1. Fuel Fills and Vents:
1.Fuel fills are located either on the aft deck or on the side decks adjacent to the aft cockpit. Fuel receptacle caps are marked "Fuel" or Fuel vents are normally located in the hull or transom below and in the same general area as the fill. If you experience difficulty filling the fuel tank, check to see that the fuel fill and vent lines are free of obstructions and kinks.
2. Antisiphon Valves:
2.As required by the U.S. Coast Guard, the fuel systems on gasoline powered boats, except outboards, are equipped with antisiphon protection. Your boat may be equipped with an antisiphon valve, which is an integral part of the barb fitting on the fuel tank to which the neoprene fuel line attaches. The valve is spring loaded and is opened by fuel pump pressure. These valves will prevent gasoline from siphoning from the fuel tank in the event of a fuel line rupture.
NOTICE
If an engine running problem is diagnosed as fuel starvation, the antisiphon valve should be checked. In the event the valve is stuck or clogged, it should be cleaned or replaced while the engine is shut down. Under no circumstances should it be removed except in an emergency.
3. Fuel Filters:
3.All fuel tanks are equipped with a fine mesh screen filter in the fuel pick-up tube in the tank, or in the tank to fuel line fitting. In addition, when supplied by the engine manufacturer, an additional filter is installed on the engine. Fuel filters should be checked periodically to see that they are clean and free of debris.
CAUTION
Avoid the storage or handling of gear near the fuel lines, fittings and tank.
Be sure to read and carefully follow the manufacturer’s instructions.
1. To Fill the Freshwater Tank:
1.Remove the upper section from the lower section. Remove the fill cap and fill to the maximum waterline level on the side of the tank. DO NOT OVERFILL. DO NOT POUR WASTE TANK DEODORIZER INTO THE FRESHWATER TANK.
2. Before use, always check the pressure build-up by pulling out the flush handle slowly with the lid closed. It is necessary to pump liquid into the basin. Keep the basin dry when not in use.
NOTICE
Use only white toilet tissue, as colored dyes may impair the effectiveness of the chemical. Use regular ply tissue. Do not use disintegrating tissue as this may clog the entire pump system.
3. To Flush:
3.Pull the holding tank flush valve handle straight out. To rinse the bowl, stroke the pump several times. Next, slowly push the valve handle straight in. This will ensure a leak proof seal.
4. To Add Chemical Deodorizer:
4.Pull the flush valve handle straight out so that the bowl clapper seal is completely open. Add 2 oz. of Liquid Gold concentrate or Royal Gold powder directly into the tank. Pump sufficient water through the bowl opening to cover the bottom surface of the lower tank.
5. Cleaning:
5.Use only mild cleansers, detergents or soaps (avoid using abrasive cleaners). Clean the toilet periodically.
6. To Empty:
6.The unit is ready to be emptied when the contents of the holding tank approach a level of 1" (2 cm) below the surface of the bowl clapper seal.
6.Make sure the flush valve handle is closed. Disengage and remove the freshwater tank from the holding tank. Unscrew the holding tank cap while the tank is in a horizontal position. Pull up on the air vent valve (red cap located on the top, front, left-hand corner of the tank).
6.Carefully empty the holding tank by grasping the tank in the front and back and slowly tilting.
6.
After emptying the tank, rinse with fresh water, replace the cap, push the air vent valve closed, reassemble and recharge the unit.
NOTICE
There are many brands of toilet chemical, any of which will work very well in any of the portable toilets supplied by Bayliner.
7. Winter Usage:
7.For cold weather use, add nontoxic winter protector antifreeze to the freshwater supply tank to prevent it from freezing.
NOTICE
Use Ethylene Glycol based antifreeze only. Petroleum based antifreeze will damage rubber parts.
8. Storage:
8.Empty both the water tank and the holding tank. Rinse out the holding tank with one cup of bleach (5% solution) per gallon (5 liters) of water.
In addition to instructions found elsewhere in this manual and in the literature specific to certain components, the following information is provided for general maintenance and repair.
Because conditions vary widely in different areas, and the frequency and type of use can differ greatly between owners, intervals for maintenance are not listed here. Common sense should determine the frequency of maintenance.
Marine Head with Holding Tank
The marine head and holding tank system is designed so that sea water is used to flush waste from the toilet into the holding tank. The holding tank is plumbed to a waste fitting on the deck for use at a dockside pump-out station, and to a macerator pump so that waste may be pumped overboard where regulations permit. The push-button switch for the macerator is usually located at the helm station.
To operate the marine head, open the seacock on the seawater intake. Before using the head, pump some water in to wet the bowl. After use, pump until the bowl is thoroughly cleaned. Pump a few more times to clean the lines. If excess waste should cause the water to rise in the bowl, stop pumping until the water recedes.
If at any time you are unable to pump water into the bowl, the probable cause is debris in the pump diaphragm. To remedy this, shut the inlet seacock and dismantle the pump. The pump is generally held together with six screws. The design is simple and the problem will be obvious when the pump body is split open.
To winterize the toilet, shut off the intake valve and pump until the bowl is dry. Remove the drain plug in the base and pump again to remove all water. Do not fill the bowl with antifreeze. The inlet seacock should be left closed while the boat is underway, or whenever the boat is left moored in the water
HOLDING TANK AND VALVE LOCATION TABLE
Model Capacity (gallons) Location of Holding Tank Location of Inlet Seacock
2355 SJ 13 stbd side engine well stbd side engine well
2655 SB 13 stbd side engine well fwd bilge under entry step
2855 SB 13 stbd side engine well fwd bilge under entry step
Note: Marine head is optional on 2355 SJ
Carefully read and follow the manufacturer's operating instructions supplied with your stove, and observe the following:
1. Use only denatured alcohol labeled specifically for marine use.
2. Do not operate the stove while underway.
3. Do not till the stove near an open flame or hot object.
4. All spilled alcohol should be wiped up prior to lighting the stove.
5. Don't put any cooking utensils on the stove until the burners are lit and functioning properly.
5.
CAUTION
Flare-up may occur during preheating, particularly if the burner valve is opened before preheating has been completed. If flare-up occurs, shut off the burner and restart the stove.
WARNING
Secure all combustible materials away from the stove before using the stove.
6. To fill:
6.Close both burners and completely loosen the retaining screw in the middle of the stove‘s front. Pull the top forward (towards you), disengaging the pegs at the rear, and lift the top of the stove up (lift at the middle of the grid to help keep the top horizontal). The stove top must only be lifted when the burner openings are completely covered by the regulating plates (burners are closed). Providing all flame has been extinguished and there is no heat glow on top of the tank, the tank unit can be lifted out.
The tank openings are recessed to facilitate filling; pour the fuel directly into the opening covered by the wire mesh. Check the fuel quantity by raising the tank to the vertical position. When fuel is visible in the recess, discontinue filling.
After filling, make certain no excess fuel remains in the stove. Always wipe the tanks dry. Place the tanks in the stove. Check to see that they fit properly in their mountings.
Make certain that both burners are closed and follow the steps shown above in reverse order to reassemble the stove.
7. To Light:
7.Turn the regulator knob counterclockwise (towards the + sign) to open the burner. Place a lighted match at the tank opening. (The match can be dropped in and removed at the next filling). If the stove is warm (from previous use), the burner may ignite suddenly and then instantly snuff itself out. If this happens, blow down into the burner opening to dissipate any alcohol fumes before attempting to relight the stove.
8. To Extinguish:
8.Turn the regulator knob clockwise (towards the - sign) to close the burner. Winterize your stove by burning all remaining fuel, and by following the directions provided in the manufacturer’s instructions
9. Electric Burners (if so equipped):
· Never attempt to use both alcohol and electric burners simultaneously. To do so will cause overheating which can destroy the electric burner elements.
· After removing the cutting board or cover, turn the appropriate burner knob to the desired setting. Make sure both alcohol burner knobs are in the closed position. The electric burner element will then heat-up fairly rapidly for use in cooking.
· When finished, turn the knob to the OFF position and allow the burner to cool-down completely before replacing the cutting board or cover back on the stove.
·
10. Regularly clean the stove as described in the owner's instructions that come with the stove.
Pressure type (demand) systems operate any time the electrical switch for the pump is in the ON position. Make sure the switch is OFF when the boat is not in use, or whenever the water tank is empty. (Switches are located in the galley.)
WATER SYSTEM SPECIFICATIONS
|
Model |
Tank Location |
System |
Water Fill |
Capacity (gal.) |
|
2355 SJ |
stbd side engine well |
hand pump |
on the tank |
13 |
|
2655 SB |
under salon floor |
demand pump |
stbd deck aft |
27 |
|
2855 ST |
under salon floor |
demand pump |
stbd deck aft |
33 |
GENERAL MAINTENANCE AND REPAIRS
In addition to instructions found elsewhere in this manual and in the literature specific to certain components, the following information is provided for general maintenance and repair.
Because conditions vary widely in different areas, and the frequency and type of use can differ greatly between owners, intervals for maintenance are not listed here. Common sense should determine the frequency of maintenance.
Bilges/Engine Compartment
1. Pump the bilges dry and remove all loose dirt. Be sure that all limber holes are open. If there is oil in the bilge and the source is not known, look for leaks in engine oil lines or engine gaskets. Oil stains can be removed by using a bilge cleaner available from your dealer or a marina. DO NOT use flammable solvents.
2. Check all wiring to be sure it is properly supported, that its insulation is intact, and that there are no loose or corroded terminals. If there are corroded terminals, they should be replaced or thoroughly cleaned with sandpaper. Tighten all terminals securely and spray them with light marine preservative oil.
3. Inspect the entire fuel system (including fill lines and vents) for any evidence of leakage. Any stains around joints could indicate a leak. Try a wrench on all fittings to be sure they are not loose, but do not overtighten them. Clean fuel filters and vent screens.
4. Inspect the entire bottom for evidence of seepage, damage or deterioration, paying particular attention to hull fittings, hoses, and clamps. Straighten kinked hoses and replace any that do not feel pliable. Tighten loose hose clamps and replace those that are corroded. Tighten any loose nuts, bolts, or screws. Operate seacocks to be sure they are in good condition.
5. Refer to your engine operating manual for engine maintenance details. Wipe off engines to remove accumulated dust and grease. If a solvent is used, make sure it is nonflammable. Go over the entire engine and tighten nuts, bolts, and screws, including the mounts. Inspect the wiring on the engine and clean and tighten the terminals. Inspect the belts and tighten them if needed. Replace any belt that is cracked or frayed. Clean and lubricate the battery terminals; fill the battery cells with distilled water as needed.
Cabin and Topside Areas
1. Test all electrical equipment and appliances to make sure they operate properly. Inspect all wiring for proper support, sound insulation and tight terminals. Pay particular attention to portable appliance cords and plugs.
2. Inspect and operate all heads, basins, showers and sinks. Also inspect the freshwater system plumbing, including the tank. Check and operate the water pumps, including the shower pump and sink drain pumps. Check all water lines and connections for leaks, and make sure all connections are tight.
3. Check bow rails, ladders, and grab rails for loose screws, breaks, sharp edges, etc., that might be hazardous in rough weather. Inventory and inspect life jackets for tears and deterioration. Check your first aid kit to make sure it is complete. Check the signaling equipment. Inspect anchor, mooring and towing lines and repair or replace as required. DO NOT stow wet lines or they may mildew and rot.
4. Salt and brackish water are capable of etching and damaging window glass. Keeping windows clean is the best preventive measure you can take. When window cleaning, flush with plenty of fresh water.
Exercise caution when cleaning windows and doors made of Plexiglas because it tends to scratch easily.
First, use generous amounts of water to wash off as much dust as possible. Use your bare hands with plenty of water to dislodge any caked dirt. Then use a soft, grit-free cloth or clean, soft sponge with a cleaner made specifically for Plexiglas. Never use a glass cleaning solution or a duster as these will scratch the surface. DO NOT use solvents such as acetone, kerosene, benzene, carbon tetrachloride, fire extinguisher fluid, dry cleaning fluid, or lacquer thinner since they will attack the surface. When you are finished, rinse with fresh water and dry with a clean, damp chamois using a blotting action.
5. To keep teak looking fresh, it should be treated with teak oil at least twice a year (more often if exposure is severe). If the teak is in particularly bad condition ask your Bayliner dealer about a good teak refurbishing kit.
WARNING
Teak oil, acetone and catalyst are hazardous materials and should be used only in well ventilated areas. Follow the manufacturer’s instructions. Also, never store rags that have been wetted with acetone, teak oil, fuel or any other solvent aboard your boat. Immediately remove them from the boat and discard them to prevent spontaneous combustion and fire.
6. Stainless steel railings and fittings should be cleaned with soap and water or household glass cleaner. Because irreversible pitting will develop under rust that remains on stainless steel for any period of time, it is best to remove rust spots immediately with brass, silver or chrome cleaner. Then coat the railing or fitting with a good automobile or boat wax. Never clean with mineral acids or bleaches. Also, do not allow stainless steel to come into continuous contact with iron, steel or other metals which could cause contamination leading to rust or corrosion.
7. A variety of high quality fabrics have been used in the construction of your boat. Proper care and cleaning of all fabrics on a regular basis will contribute to their long life. The most important thing to remember is that stains must be cleaned up immediately if the original beauty and strength of the fabric are to be maintained over a long period of time. Independent laboratory testing has shown that some sunscreen lotions and oils can permanently stain most types of vinyl’s and fabrics, so exercise care when using these products. Prior to cleaning any fabric, we suggest that you test your cleaning solution and method on a hidden or inconspicuous area. That way, if that particular cleaning method causes damage, it will be confined to a small, less noticeable area. Convertible tops, Naugahyde® dash panels (if your boat is so equipped), and vinyl upholstery can be cleaned using a mild soap and warm water solution also. Rinse after scrubbing with plenty of cold, clean water and air dry in a well ventilated place, again preferably away from direct sunlight.
Vinyl cleaners and conditioners are NOT recommended for use on Bayliner upholstery, as they tend to remove plasticizers that extend the life of the vinyl. To prevent rainwater seepage at the seams, a coating of Scotch Gard® can be applied.
Mildew can occur if your boat does not have adequate ventilation, Heat alone will not prevent mildew; you must also provide for fresh air circulation. If mildew does occur, it often can be removed using a solution of warm water and laundry bleach (one cup of bleach to one gallon of Warm water). Brush the solution into the affected area, let it sit for 10 to 15 minutes, and rinse with plenty of cold, clean water. Air dry in a well ventilated place, once again preferably away from direct sunlight.
If at all possible, the vinyl top parts of your boat should be stored indoors in a fairly warm, dry place. This will greatly extend the life of the material.
Dry cleaning should be considered for interior fabrics other than vinyl.
8. When instruments are exposed to a saltwater environment, salt crystals may form on the bezel and the plastic covers. These salt crystals should be removed with a soft, damp cloth; never use abrasives or rough, dirty cloth to wipe plastic parts. Mild household detergents or plastic cleaners can be used to keep the instruments bright and clean.
Hull
1. The finish on a fiberglass boat is similar to that of an automobile and will respond to the same system of care and cleaning.
Use a sponge and a mild soap and warm water solution to clean exterior surfaces of your boat. Rinse the boat well with plenty of clean water. Use a quality boat wax to protect the finish, but avoid waxing polyethylene swim platforms, as they can be destroyed by the chemicals in some waxes. Note that there are a variety of polishes and cleaners for fiberglass on the market. We suggest that you experiment with different brands to determine which work best for you.
2. Almost unavoidable during the life of your boat is damage to the gelcoat or colored surface. This is not as serious as you might think. Repair is not costly and can be done by the novice. Scratches: if the scratch does not penetrate the gelcoat surface, it can be repaired with automotive rubbing compound. Dampen a soft rag and apply the compound by rubbing in a circular motion. The scratch may not disappear completely; however, it will become less noticeable.
Gauges and Chips: To repair, obtain “patch paste” from your Bayliner dealer and follow this recommended procedure:
· Clean the area to be repaired of wax and oil. Acetone is a good solvent.
· Mix a small portion of patch paste and catalyst on a piece of cardboard according to the manufacturer’s instructions.
· Apply the paste to the gouge with a putty knife or flat-edged stick; try to match the paste to the surface contour of the area being repaired. It is better to have an excess of paste, rather than not enough.
· Allow the paste to harden thoroughly. In most climates, one to two hours should be sufficient.
· Shape the patch as desired using fine wet sandpaper.
· Finish by using automotive rubbing compound in the same manner as you did for small scratches.
WARNING
Teak oil, acetone and catalyst are hazardous materials and should be used only in well ventilated areas. Follow the manufacturer’s instructions. Also, never store rags that have been wetted with acetone, teak oil, fuel or any other solvent aboard your boat. Immediately remove them from the boat and discard them to prevent spontaneous combustion and fire.
3. Bottom paint on boats is designed to dissolve slowly to prevent marine growth. Therefore, it is unusual to find a boat bottom that does not need repainting after a season's use.
Periodically haul the boat out of the water and scrub the bottom with a bristle brush and a solution of soap and water. It is not always necessary to repaint the bottom each time it is scrubbed, but no bare spots should be permitted.
Our recommended procedure for painting the bottom is as follows:
· Prepare the bottom by sanding, cleaning and fairing as required.
· It is imperative that the new paint be applied over a perfectly dry surface. Fiberglass hulls should never be hauled, painted and relaunched on the same day, since this does not allow sufficient time for the moisture which has been absorbed into old paint film to completely dry out. Generally, 24-36 hours of drying time will be required.
NOTICE
Bayliner recommends the application of an epoxy barrier coating, such as International Paint Company's lnterlux "lnterprotect 2000 or 3000 Systems“, to help seal the hull bottom and reduce the possibility of gelcoat blistering on any boat that is moored. The barrier coating should be covered with several coats of antifouling paint. Note that many states regulate the chemical content of bottom paints in order to meet environmental standards. Check with your local Bayliner dealer about recommended bottom paints, and about laws that are in effect in your area.
4. Whenever your boat is out of the water you should check all metal parts for stray current or galvanic corrosion. Stray current corrosion, or electrolysis, can be prevented several ways. The following are the most common causes and the simplest cures:
· Wiring may leak a certain amount of electricity: Keep a clean, dry bilge
· A poorly grounded zinc anode: Check the ground wire and clean all contact surfaces.
· The zinc anode may be deteriorated beyond effectiveness. Replace it when it has deteriorated 50% or more.
· If your boat is moored, we recommend that you contact someone in your area specializing in corrosion control and have them check your boat in its moorage to see that it is properly protected.
5. Propellers should be inspected often for damage. Every attempt has been made to equip your boat with a propeller that will optimize performance. However, your boating needs may dictate a propeller change. Your Bayliner dealer can help you in the selection of propellers better suited to your needs.
6. Flapper valves on cockpit scuppers should be checked often to see that they are pliable and are providing the proper sealing action.
STORAGE
The following suggestions are offered for storage at the end of your boating season.
1. If your boat is to be stored out of the water, it is extremely important that its hull is properly supported to avoid permanent hull distortion. If your boat is stored inside, it should be in a well-ventilated building.
2. A temporary winter cover is recommended if covered storage isn't available. A proper winter cover should keep the weather off the boat, but still provide adequate ventilation. Wrapping a boat in a tight plastic cover can do more damage than good. Dampness and lack of air circulation provide ideal conditions for the fungi that cause mildew and dry rot.
3. If you are storing your boat on its trailer:
· Now is a good time to repack the trailer's wheel bearings. Your local auto service center can help you.
· Block the trailer wheels off the ground to avoid tire deterioration.
· Loosen the stern tie-downs to avoid stress on the hull.
4. If you are storing your boat up on blocks:
4.Use three blocks, each with at least two square feet of bearing surface. Place one block under each corner of the transom, with the third one going up forward under the keel. Preferably, the forward block should be V-shaped, and should be located under a bulkhead.
5. Refer to your engine manual for engine storage instructions.
6. Drain the freshwater tanks and lines by opening all faucets and operating the water pump (on boats so equipped, be sure that the hot water tank power switch is turned OFF). Operate the pump until all tanks and lines are empty and no water flows from any of the faucets. Also, drain the pump to prevent damage that can result from freezing.
7. Flush each head several times. If the boat is to be stored in saltwater, close the intake seacock, add fresh water to the bowl and allow it to stand for a day or more to dissolve accumulated salt. Then, with the seacock closed, flush the head until it is pumped dry. Pump out holding tank.
8. Fuel tanks should be filled so there is little air space, thereby minimizing condensation.
9. Refer to your engine manual for storage procedures related to the batteries, and to the engine seawater cooling system.
10. Thoroughly clean your boat. If possible, remove cushions, mattresses, blankets, towels, and other items that can hold moisture and cause mildew. Such items left on board should be positioned for maximum air circulation. Stand mattresses and cushions on edge. Prop open doors, hatches, cabinets and ski lockers to allow fresh air to circulate.
11. Defrost and dry out the refrigerator and freezer; leave the doors propped open. Leave all drawers and locker doors open.
12. Clean all deck hardware; then coat the hardware with rust inhibitor.
13. Lubricate the steering mechanism and throttle control linkage.
14. Close all seacocks.
15. Provide as much heat and ventilation for interior spaces as is safe and practical. We hope these preventive measures will help make getting ready again in the spring easier. Should you have any questions, your Bayliner dealer is anxious to provide assistance.
ABEAM: To one side of a vessel,at a right angle to the fore-and-aft line.
AFT: Near or at the stern.
BEAM: The width of the hull.
BILGE: The lowest portion inside a boat (in a Fiberglass boat, generally the underdeck and lower portion of the engine compartment).
BOW: The forward portion of the boat.
CHINE: The intersection of the side and bottom of a V-bottom boat.
DRAFT: Vertical distance from the waterline of the boat to the lowest point of the boat.
FATHOM: A measurement of six feet,generally used to measure water depth.
FREEBOARD: Vertical distance from the deck to the waterline.
GUNWALE: The upper edge of the side of a boat.
HATCH: A deck opening providing access to the space below. Normally fitted with a cover.
HEAD: Toilet or toilet room.
HELM: The tiller, wheel, and other steering gear.
KEEL: The lowest external portion of the hull.
KNOT: Nautical mile per hour; one nautical mile is 6,076 ft.; a land mile is 5,280 ft.
LEE: The direction toward which the wind blows.
PORT: To the left side of the boat facing forward.
PORTLIGHT: A hinged window in the boat's cabin or hull.
SCUPPER: An opening in a deck or cockpit permitting water to drain overboard.
STANCHION: A fixed, upright post used for support (of rails or lifelines).
STARBOARD: To the right side of the boat facing forward.
STERN: The after portion of the boat.
STERN DRIVE: Inboard/outboard propulsion unit.
TRANSOM: The transverse part of the stern.
WINDWARD: The direction from which the wind is blowing.
WARNING LABELS
The location of the warning labels and on your boat and an example of each is shown below. Warning labels should be replaced if damaged, removed or lost. Replacements can be ordered through your dealership.
A WARNING
Rotating propeller.
Rotating propellers can cause serious injury or death.
Do not attempt to board the boat or use the boarding ladder if the engine is running.
P/N 53827
Located on the transom, next to the ladder.
A WARNING
Carbon monoxide hazard.
Breathing carbon monoxide may cause injury or death.
Keep hatch closed while engines or generator are running.
FIN 52041
Located on the alt berth window.
Used on diesel boats.
Located above the fuel fill on the deck.
Pl N1 4000
3 1) USE GASOLINE ONLY. GASAHOL OR OTHER FUEL ADDITIVES MAY DAMAGE FUEL SYSTEM.
LEAKING FUEL IS A FIRE AND EXPLOSION
HAMRD. INSPECT SYSTEM AT LEAST ANNUALLY.
Used on gas boats.
Located above the fuel fill on the deck.
P/N 32219
Located above the water fill on the deck.
P/N 13120
 WIRING DIAGRAM 2355 SJ Single Engine
WIRING DIAGRAM 2655 Single Engine
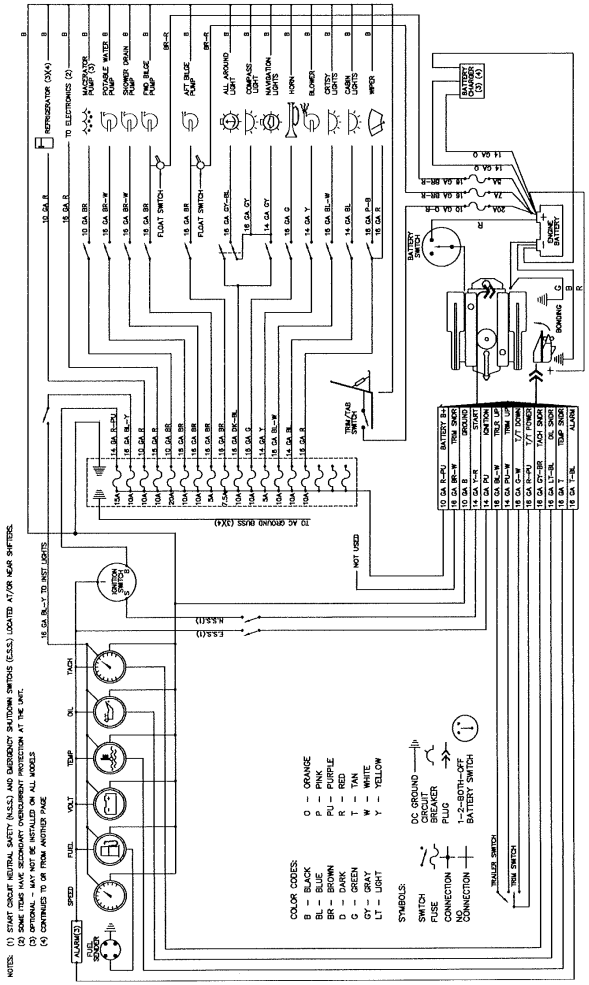
WIRING DIAGRAM 2855 ST Gas Engine
 &xnbsp;
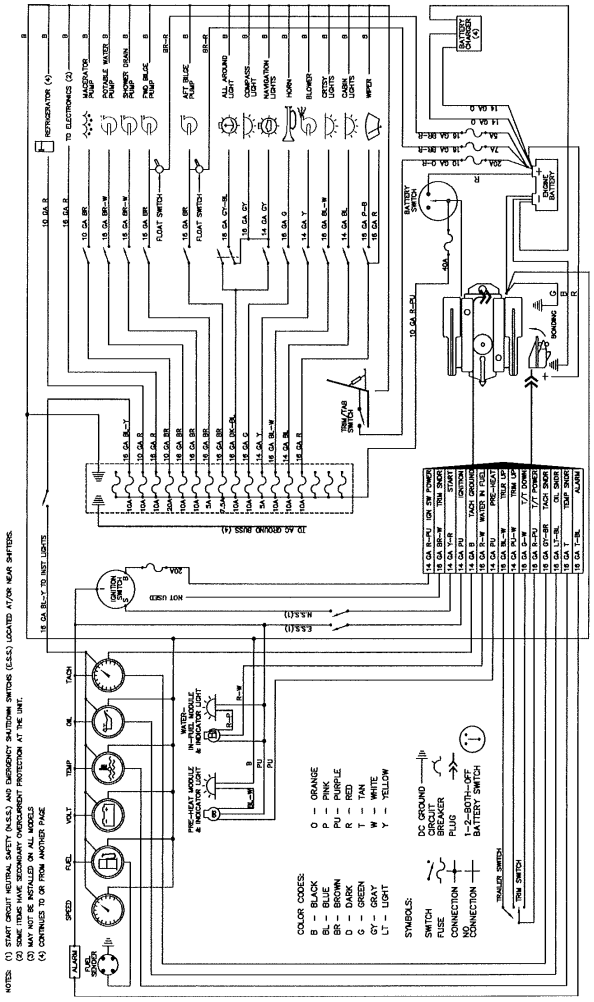 WIRING DIAGRAM 2855 ST Diesel Engine
&xnbsp;
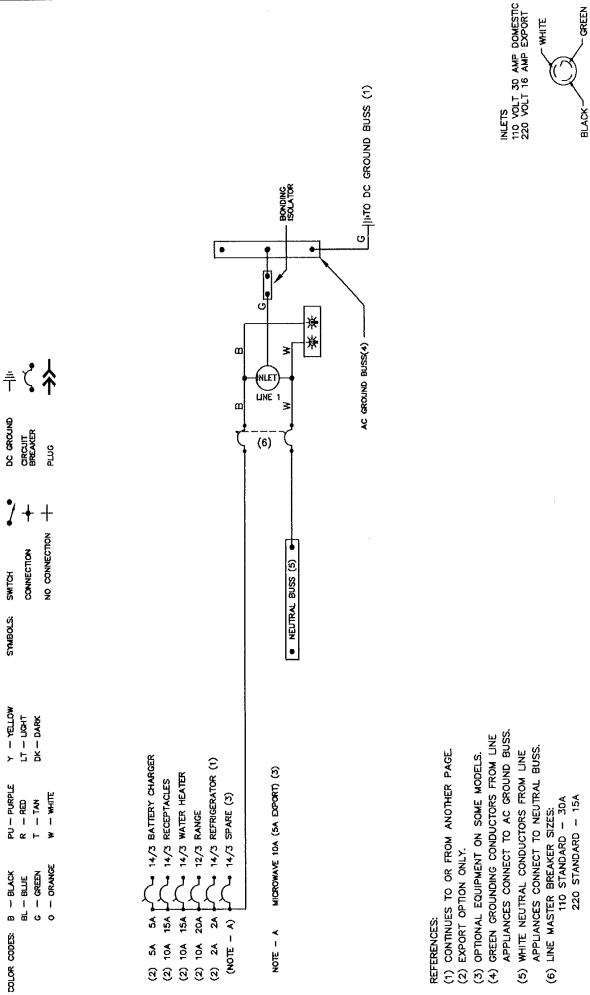 WIRING DIAGRAM Single Dockside
WIRING DIAGRAM Dual Dockside
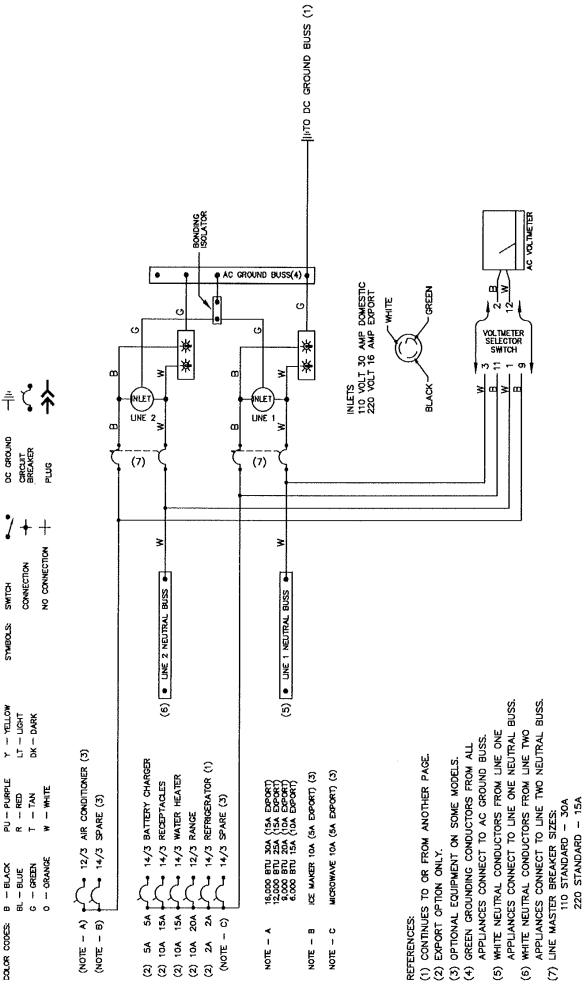
LIMITED WARRANTY
Bayliner warrants to the original purchaser of its 1995 model boats, purchased from an authorized dealer, operated under normal, noncommercial use that the Selling Dealer will:
A. Repair any structural hull detect which occurs within five (5) years of the date of delivery.
B. Repair or replace any parts found to be detective in factory material or workmanship within one (1) year of the date of delivery.
What is not covered
This warranty does not apply to:
1. Engines, drive trains, controls, props, batteries, or other equipment or accessories carrying their own individual warranties;
2. Engines, parts or accessories not installed by US Marine;
3. Plexiglas windscreen breakage; rainwater leakage on Runabout models; rainwater leakage through convertible tops; minor gelcoat discoloration, cracks or crazing or air voids;
4. Hull blisters that form below the waterline;
5. Normal deterioration, i.e. wear, tear, or corrosion of hardware, vinyl, tops, vinyl and fabric upholstery, plastic, metal, wood, or trim tape;
6. Any Bayliner boat which has been overpowered according to the maximum horsepower specifications on the capacity plate provided on each Bayliner outboard boat;
7. Any Bayliner boat used for commercial purposes;
8. Any defect caused by failure oi the customer to provide reasonable care and maintenance:
Other Limitations
THERE ARE NO OTHER EXPRESS WARRANTIES ON THIS BOAT. TO THE EXTENT ALLOWED BY LAW:
1. Any implied warranty of merchantability is limited to the duration of this written warranty.
2. Neither Bayliner nor the Selling Dealer shall have any responsibility for loss of use of the boat, loss of time, inconvenience, commercial loss or consequential damages.
3. Some slates do not allow limitations on how long any implied warranty lasts, so the above limitation may not apply to you. Some states do not allow the exclusion or limitation of incidental or consequential damages, so the above limitation or exclusion may not apply to you. This warranty gives you specific legal rights, and you may also have other rights which vary from state to state.
Your Obligation
In order to comply with Federal regulations, it is essential that your warranty registration card be submitted within 30 days of delivery of your boat. Return of this card is a condition precedent to warranty coverage. Before any warranty work is performed, we require that you contact your Selling Dealer to request warranty assistance.
We require that you return your boat, at your expense, to your Selling Dealer or, if necessary, to the Bayliner factory. You will be responsible for all transportation, haul outs and other expenses incurred in returning the boat for warranty service.
Bayliner Marine Corporation
PO Box 9029
Everett, WA 98206
Phone (206) 435-5571
PART #59071
Bayliner Marine Corporation
PO
Box 9029 Everett, WA 98206
PART #59071